Create A Character Type
A Character Type is an asset which stores the fundemental information needed for your characters.
This guide will walk you through how to create and set one up.
Read More → Character Type Assets
Note
If you're using the built-in BlazerTech Modular Characters or other pre-configured characters, skip to Creating a Character Template.
1️⃣Create The Character Type Asset
To Create a Character Type asset:
Right Clickthe Project window- Navigate to: Create > BlazerTech > Character Management System >
- Choose either Layered or Unified Character Type
this asset can be named anything you want.

Choosing a Character Type
The Character Management System includes two types of characters, Unified and Layered characters.
A Unified Character is contained entirely in one spritesheet, this spritesheet has every animation and every frame for the character.
Unified Characters are simple to setup but lack customization options due to the character being pre-created.
A Layered Character is split into multiple spritesheets where each spritesheet is a visual layer of the character.
An example of a layered character could be as follows: Body > Eyes > Outfit > Hairstyle > Accessory
Where each spritesheet is layered on top of the previous one at runtime to create the final character you see in-game.
When you create a Character Type asset you must select either the Unified or Layered version. Both can be created if you wish to utilize both Unified and Layered characters.
Read More → Choosing a Character Type
2️⃣Setup the Character Type Asset
Two fields are required to be set for the asset to be useable.
Field 1: Character Type ID
This is a unique identifier for this Character Type. Make sure it's not the same as any other Character Types.

Field 2: Base Spritesheet
This spritesheet determines the layout of all character spritesheets using this same type.
All other character spritesheets must be the same size and contain the same frames contained within the Base Spritesheet.
The Base Spritesheet should be your character in its most basic barebones state.

For more information about the Base Spritesheet read here.
Optional Field: Animator Controller
An Animator Controller can be assigned in your Character Type asset which will be used automatically when a character is rendered in-game.
This is not required if you have your own system for animating your characters.
Animations should only use sprites from the Base Spritesheet, otherwise they won't be renderered correctly. Read more.
If you’re using your own movement or animator handling scripts, you can configure the Animator Controller however best fits your system. However the Character Management System also includes built-in movement and animator handler scripts Which require the Animator Controller be setup with specific parameters
Later in this guide when you learn how to render your character, you’ll see how the Animator Controller can be automatically applied when the character is used.
Note
No further setup is required for Unified Character Types.
3️⃣Layered Character Type Asset Setup
Layered Character Types require that we define what layers a character contains.
Layerd Characters are composoed of multiple layers where each layer is stacked on top of each other in order to create the final character.
E.G. Body > Outfit, Hairstyle > Accessory
The body is rendered first, then the Outfit, then the Hairstyle and finally the Accessory.
Each layer is represented as its own Character Layer Definition asset.
This asset contains all spritesheets (Layer Options) that can be used for that layer of the character.
Create Layer Definitions
To create a new Layer Definition:
Right clickthe Project window- Navigate to: Create > BlazerTech > Character Management System > Layered Character Type > Layer Definition

Create a new Layer Definition asset for each layer you want your characters to have.
Refer to Adding Layer Options to learn how to add your spritesheets as options for your layer.
Assign Layer Definitions
Once all your Character Layer Definition assets have been created they need to be assigned in your Layered Character Type.
- Open your Layered Character Type asset in the inspector
- locate the Layers list.
- Add all your Layer Definitions to that list.
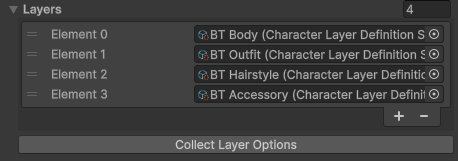
The order of the layers in this list determines the render order.
Layers are rendered from top to bottom in the list, meaning:
- Top of List = Rendered First (Behind)
- Bottom of List = Rendered Last (In Front)
Next Steps
Learn how to create your first Character Template which you can then create characters from during runtime.