Use Your Character
We're now going to create a character from the Character Template you've created and render it in-game.
Character Renderer components can create characters and render them for us. They handle all the setup for you meaning all you need to do is assign your Template.
1️⃣Setup
Create a new GameObject, this will be our character.
If you're using a Unified Character Type, add the Unified Character Template Renderer component.
If you're using a Layered Character Type, add the Layered Character Template Renderer component.
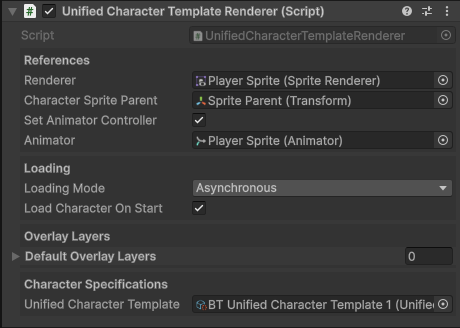
Character Renderer Fields
The following fields are required and must be set for all Character Renderers.
References
| Field | Description |
|---|---|
| Renderer | Typically a Sprite Renderer. The Character Shader will be applied to this. |
| Set Animator Controller | Toggles whether to use the Character Controller from the Character Type. |
| Animator | The Animator component to assign the controller to. |
Loading Settings
| Field | Description |
|---|---|
| Loading Mode | Asynchronous: loads in the background without freezing gameplay.Synchronous: loads immediately but may briefly freeze the game. |
| Load Character On Start | Automatically loads the character in Start(). If disabled, GetAndShowCharacter() must be called manually. |
Template Reference
At the bottom of the component, assign your Character Template (Unified or Layered).
This defines which character is created at runtime.
2️⃣Test Your Character
Now enter Play Mode.
If Load Character On Start is enabled, you'll see your character in-game.
Congrats!
You now have your first character rendered at runtime! Creating more characters is as easy as seting up a new Character Template.
Happy game making!